
7 Kids Summer Crafts The Whole Family Can Do Together
Summer activities can be made even more fun if the whole family can bond together! From simple painting projects to unique scientific crafts, here are 7 kids summer crafts the whole family can do together.
1. Painted Rock Critters Craft
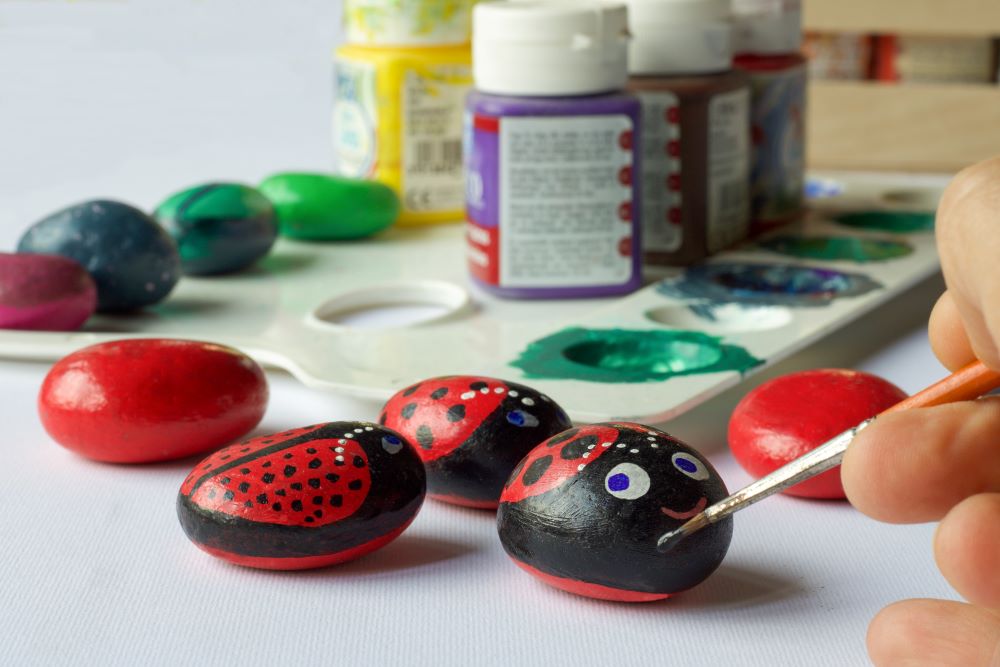
Painted rocks are a perfect kids summer crafts because they’re easy to make and they can be used as garden or outdoor decorations afterwards. Kids can use their own creativity to paint their favorite outdoor critters such as ladybugs, bees, butterflies, and more! Stencils are a great idea for younger kids to help them make the exact design that they want.
Materials Needed
Rocks (From Craft Store)
Acrylic Paint (Assorted Colors)
Thin Paintbrushes
Paint Sealing Spray
Gems or Beads
Superglue
Stencils (Optional)
Instructions
- Select any stencils that you want, print out a picture for inspiration, or you can choose to freestyle your design.
- Paint each rock with your critter design and wait for them to dry.
- Once the paint dries, glue on any gems or beads to complete your design.
- Take the rocks outside and spray them with the paint sealing spray.
- Once they’re completely dry, scatter them around the garden or display them indoors on windowsills and tables!
2. Homemade Watermelon Soap With Essential Oils Craft

Homemade soap is a fun craft that you can do with older kids! This watermelon themed soap is perfect for the summertime and will look cute in your kids’ bathroom. The craft allows you to use any scented essential oil that you want; however, if you want a refreshing summertime scent, opt for a fruity one such as lime, lemon, or orange.
Materials Needed
Silicone Loaf Soap Mold
Goat’s Milk Soap Base
Clear Soap Base
Soap Colorant (Green & Red)
1 Tablespoon Chia Seeds
Essential Oils (Any Scent You Want)
Instructions
- Start by cutting the goat’s milk soap into cubes. You’ll want to cut about 1/2 lb of the soap.
- Microwave the cubes in 30-second increments, making sure to stir well. Once it’s fully melted, add about 10 drops of your essential oil along with as much green soap colorant as you need.
- Next, add about 3/4 of this green mixture to the bottom of the soap mold. Let it sit for 15-20 minutes until firm.
- Once the green layer is firm, it’s time to make your red layer.
- Cut your clear soap into cubes, using about 2 lbs of it.
- Microwave the clear soap in 30-second increments, stirring in between until fully melted. Once melted, mix in the red colorant.
- Add in about 15-25 drops of essential oil along with 1 tablespoon of the chia seeds.
- Pour the red layer on top of the green layer in the mold and let it sit for 90 minutes.
- Once firm, carefully remove the soap from the loaf mold.
- Cut the soap into normal bars or cut them into triangles or half circles to even more closely resemble watermelon!
3. Popsicle Stick Picket Fence Garden Craft
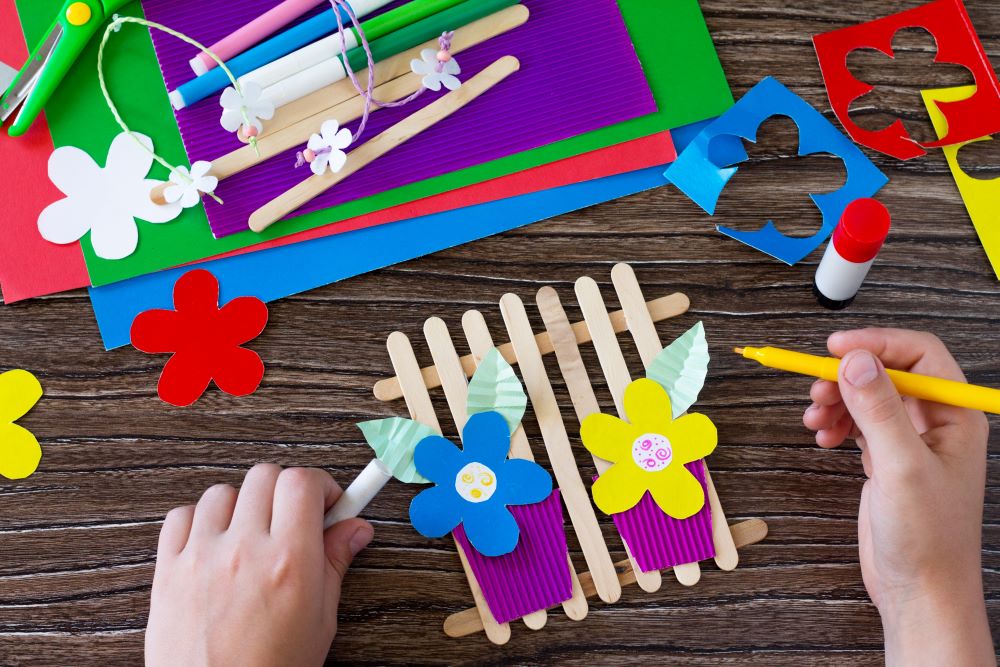
This craft is a cute way to get younger kids excited about summertime and flowers! This is an especially fun craft for kids who love to help out in the garden because they can make their own mini felt garden with tons of creativity and colors.
Materials Needed
Popsicle Sticks
Glue Stick Or Superglue
Felt Squares (Variety Of Colors)
Sharpies Or Markers
Scissors
Flower Stencils (Optional)
Magnet Strips
Instructions
- Start by making the Popsicle stick fence. Place 2 Popsicle sticks on the table horizontally and glue 7 Popsicle sticks in between them vertically.
- Optionally, you can paint or color the Popsicle sticks to have a colored fence.
- Next, cut different colored flower shapes out of the felt squares. Your can choose to use stencils for this.
- You can also cut out other relevant shapes such as pots for the flowers to be in.
- Line your flowers and shapes up on your fence before gluing them down.
- Cut small circles out of white felt and glue them in the center of each of your flowers. Then, color or decorate the white circle with a Sharpie or marker.
- Once the project is dry, place magnet strips on the back to display on your fridge!
4. DIY Sidewalk Chalk Craft
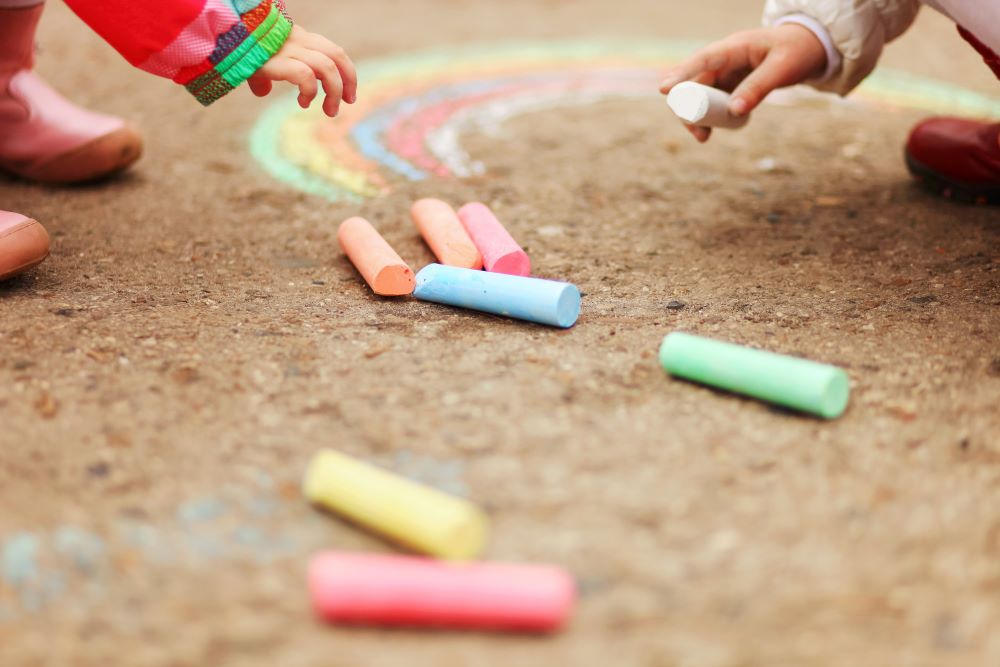
Drawing with sidewalk chalk is an exciting outdoor activity for the summer. Crafting your own chalk can make it even more fun! Kids of any age can complete this craft with adult supervision. Not only does it result in a variety of colors to draw with, but the process is also a cool science experiment that kids can learn from!
Materials Needed
1 Cup Water
2 Cups Plaster Of Paris
3 Tablespoons Tempera Powder Paint (Variety Of Colors)
Empty Toilet Paper Rolls (One For Each Color)
Masking Tape
Parchment Paper
Old Tin Can (For Mixing)
Instructions
- Start by sealing off one end of each toilet paper roll with masking tape. Make sure it’s covered tightly to prevent any leakage.
- Next, line each of your toilet paper rolls with parchment paper.
- It’s time to start mixing your colors! Pour 1 cup of water into the tin can. Gradually add in the 2 cups of plaster of Paris, followed by 3 tablespoons of tempera powder paint in the color of your choice. Make sure to carefully stir.
- Pour into a toilet paper roll.
- Repeat steps 3 and 4 with various colors.
- It will take about 15 minutes for it to begin to heat up – do not touch!
- Let the chalk harden for at least a couple of hours before you carefully peel them off the rolls.
- Now take them outside and draw some sidewalk creations!
5. DIY Scented Bubbles Craft
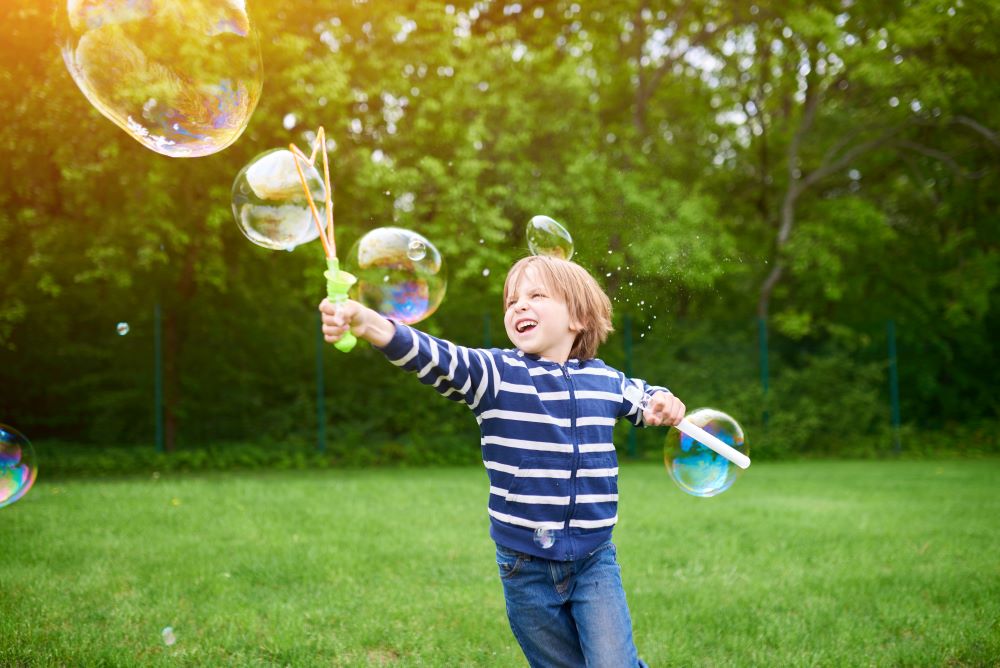
Blowing bubbles is fun and carefree summer activity that kids of all ages enjoy! This DIY Scented Bubbles Craft takes that activity to the next level and is so easy to make. The craft allows for essential oils in any scent that you want; however lavender is a popular choice. You can optionally add food coloring to your bubbles for and even more exciting outcome!
Materials Needed
1 1/2 Cups Water
1/2 Cup Unscented Clear Dish Soap
1/4 Cup Light Corn Syrup
3-5 Drops Essential Oil (Scent Of Your Choice)
Food Coloring (Optional)
Mason Jar
Instructions
- Pour the water, dish soap, and corn syrup into your mason jar. Make sure the water is lukewarm.
- Mix the liquids together until fully combined.
- Next, drop in 3-5 drops of the essential oil of your choice and mix together.
- Optionally, mix in food coloring to make fun colored bubbles.
- Finally, take it outside with a bubble wand and have fun!
6. DIY Unicorn Sprinkle Slime Craft
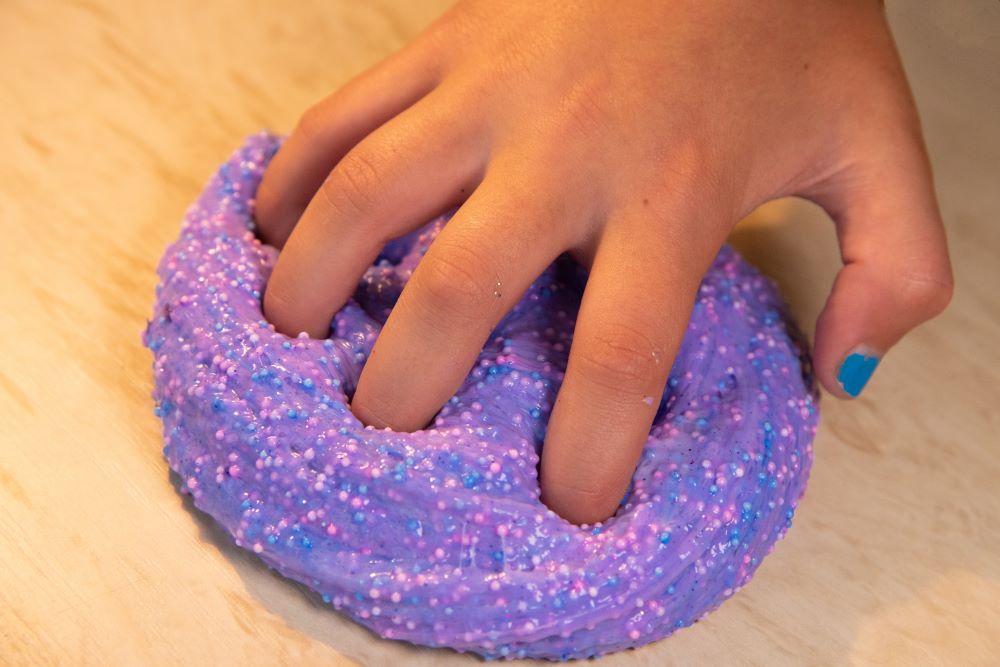
When it come to kids summer crafts, making slime is a must! Slime is such a popular craft across the internet these days, and this unicorn sprinkle slime is perfectly magical and cheerful for the summertime. Both kids and teens will enjoy this craft!
Materials Needed
4-Ounce Bottle Of Liquid Glue
3 Teaspoons Of Baking Soda
1 Teaspoon Of Contact Solution
3-4 Drops Of Purple Food Coloring (Or Any Color)
Pastel Sprinkles
Instructions
- Start by emptying the bottle of glue into a metal mixing bowl.
- Next, pour in 3 teaspoons of baking soda. Then add in 1 teaspoon of contact solution.
- Add 3-4 drops of your food coloring.
- Stir up your mixture thoroughly until you have a slim consistency.
- Continue to knead the slim with your hands until it becomes slightly less sticky.
- Finally, pour a healthy pile of sprinkles onto your slime and knead them in until they’re distributed throughout.
- Now you have beautiful slime to play with!
7. DIY T-Shirt Painting & Decorating Craft
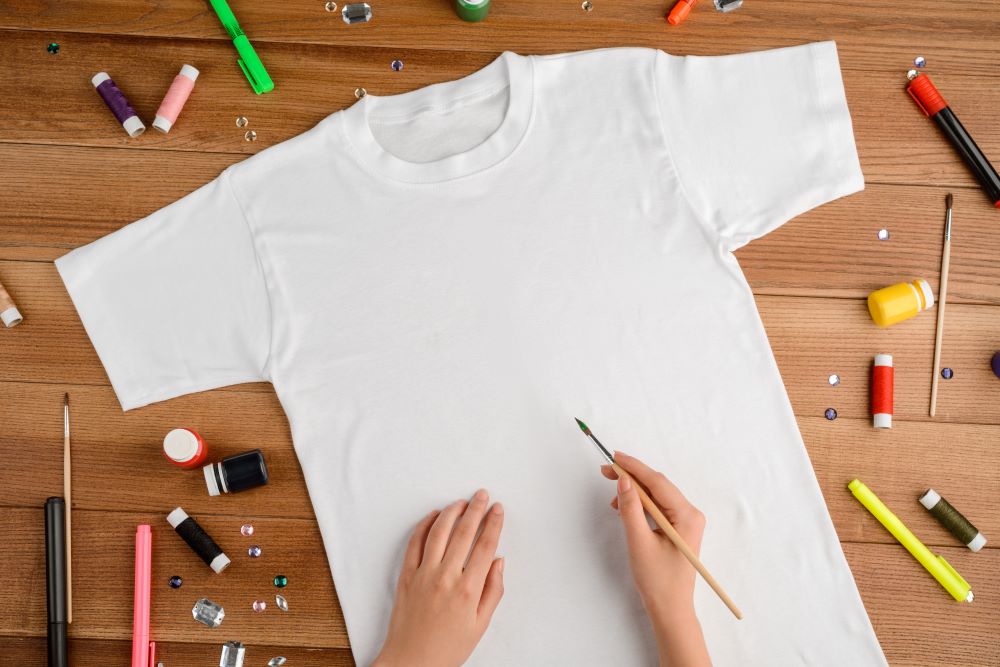
This t-shirt painting and decorating craft is a creative activity for kids of all ages! There’s no specific instructions on how to make these shirts; encourage your kids to make them look however they want. It’s best to make these t-shirts outside on a tarp because this craft can get a bit messy!
Materials Needed
White T-Shirt
Fabric Paints Or Pens (Variety Of Colors)
Variety Of Jewels
Variety Of Felt Shapes
Fabric Glue
Cardboard Squares (To Fit Inside Of The Shirts While Crafting)
Instructions
- Start by inserting a cardboard square into the t-shirt to make a steady surface and to keep any paint from running through to the other side.
- Be creative! Use fabric paint or pens to draw magical creations or use stencils to draw specific things.
- After using paint or pens, finish decorating by gluing on a variety of gems and felt shapes.
- Make sure the t-shirt dries completely before wearing!
Looking for more summer inspiration? Shop our June Catalog to find amazing values on garden decor, outdoor lighting, summer themed bed and bath collections, and much more!


