
7 Easy DIY Christmas Decorations
Making your home festive for Christmas can be affordable and easy. Crafting your own decorations can save you money and can also give your home a personal touch. From ornaments to decorative accents and more, here are 7 easy DIY Christmas decorations to display around your home this holiday season.
1. DIY Christmas Ornament Wreath

This DIY Christmas Ornament Wreath is a simple craft that results in a unique and beautiful decoration! If you’re looking for creative holiday decorations for your home, this craft is an interesting alternative to the classic Christmas pine wreath.
Feel free to use any colors you want for your ornaments to create any look or theme that you desire. If you want a more traditional theme, opt for red and green ornaments, for a winter wonderland theme, choose blue and silver ornaments, or for a more playful theme, choose a variety of fun colors such as pink and purple.
Supplies Needed
Wire wreath frame
Hot glue gun
Tinsel garland (or other garland)
Ornaments (in various sizes and colors)
Mini pine cones & other accents (optional)
How To Make It
Step 1: Start by wrapping the garland around the wreath frame. This will be your base for the ornaments, so make sure to cover the entire frame.
Step 2: Hot glue gun your ornaments on top of the garland. Start with the larger ornaments, and then gradually fill in the spaces with smaller ones.
Step 3: You can also fill in the spaces with some mini pine cones or other accents like little bells.
Step 4: Once the glue dries, display your wreath on your front door or hang it on the wall above your mantel.
2. DIY Salt Dough Christmas Ornaments
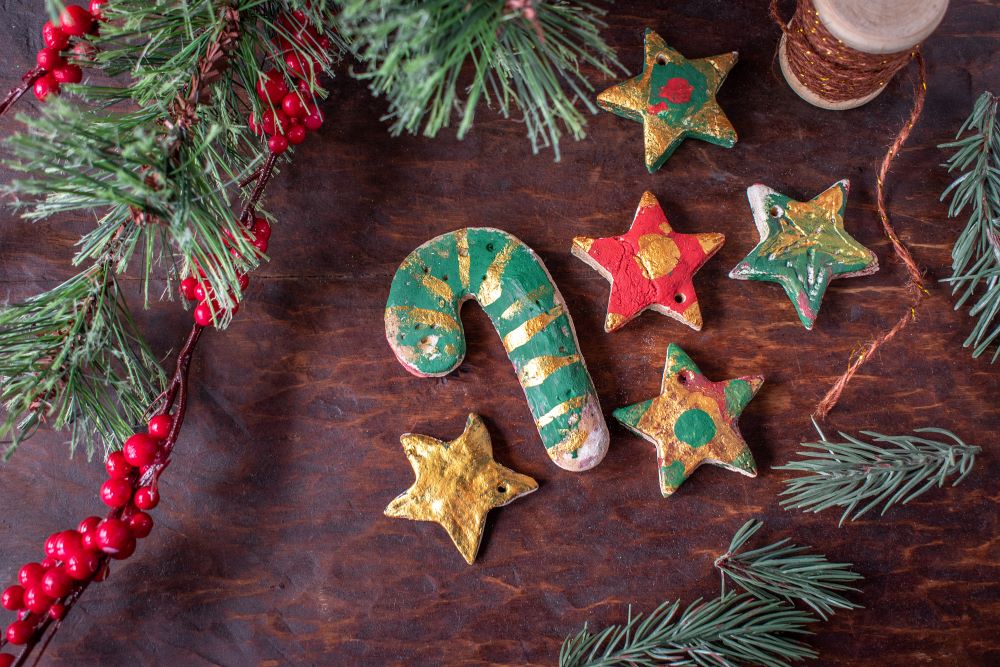
These DIY Salt Dough Ornaments is a fun Christmas craft to do with your kids! Make it a fun family activity to craft these ornaments this holiday season. These DIY Christmas decorations will look beautiful with your other ornaments.
You can use a lot of your own creativity with this craft. Choose whatever shapes you want for your cookie cutters, whether it’s stars, candy canes, trees, or other holiday themed icons. You can also have fun with painting with any patterns and colors that you want. Make these ornaments special to you!
Supplies Needed
4 cups flour
1 cup salt
1 1/2 cups warms water
Cookie cutters (any shape you want)
Acrylic paint (any colors you want)
Toothpick
Ribbon
How To Make It
Step 1: Mix together the flour and salt in a large mixing bowl.
Step 2: Next, slow pour the warm water into the bowl while continuously stirring. Keep mixing until all the water is poured in.
Step 3: Knead the dough until it’s smooth and stays together.
Step 4: Now it’s time to roll and cut your salt dough ornaments! Lay down some parchment paper and put a large portion of the dough in the center. Place another piece of parchment paper on top.
Step 5: Using a rolling pin, roll out the dough until it’s about 1/8 inch thick. Make sure the dough isn’t too thick because they’ll break too easily.
Step 6: After the dough is rolled out, use your cookie cutters to cut shapes into it. Make sure to not remove the shapes just yet.
Step 7: Once you’ve finished with the cookie cutters, you can peel away the dough around the shapes. Then, use a toothpick to poke a hole on the top of each ornament where the ribbon will later go.
Step 8: Now it’s time to bake your ornaments. Bake them for about 1 hour at 300 degrees. They’re done once they’re hardened.
Step 9: Once the ornaments have cooled down, you can start painting! Paint with any colors and patterns of your liking.
Step 10: Finally, string each ornament with some ribbon on the top and hang them up on your tree!
3. DIY Sequin Christmas Ornament

If you enjoy a little glitz and glam, you’ll love this DIY Sequin Christmas Ornament craft! This craft may take a little bit of patience to place each sequin neatly on the ornament, but the results are worth it.
You can even swap out the sequins for something different, such as sparkly beads or other crafting items. If you want to make an extra sparkly ornament, you can even put glue around the ornament and sprinkle glitter to cover the entire surface area.
Supplies Needed
Blank ball ornaments
Liquid glue
Sequins
Yard or ribbon
How To Make It
Step 1: Glue your sequins onto the ornament by doing it one section at a time. You can create a unique color pattern by planning out the different sections of the ornament.
Step 2: Make sure to cover up the entire surface area of the ornament to get the full effect.
Step 3: Lastly, cut some yard or ribbon to tie on the top. Display your new sequined ornament on your tree!
4. DIY Santa Claus Chimney Decoration
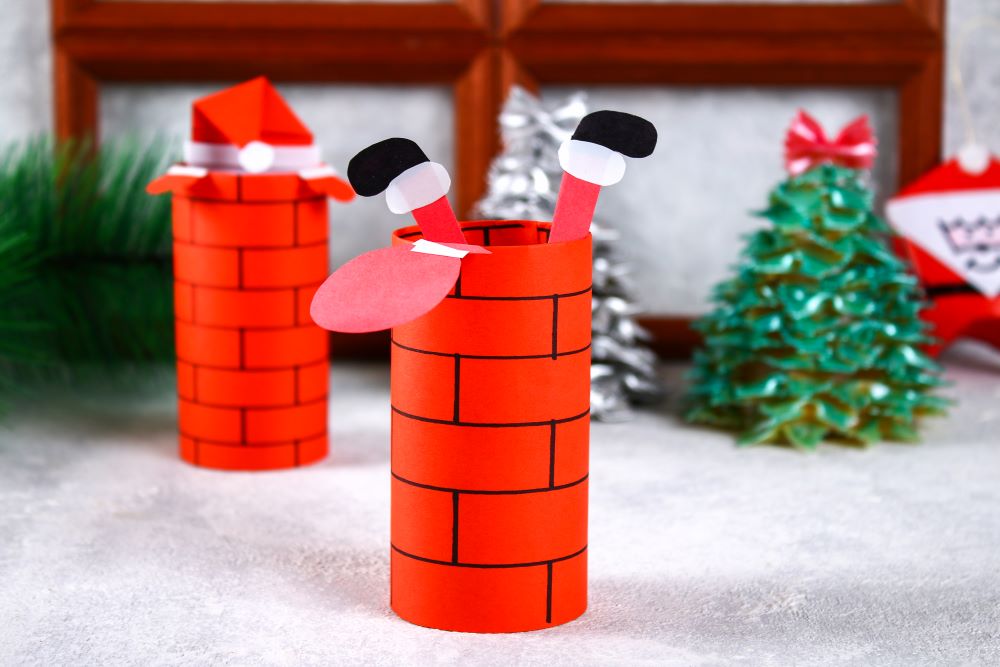
This DIY Santa Claus Chimney Decoration is a cute and charming decorative accent to add to your holiday themed home! Combine these with other DIY Christmas decorations to result in a truly unique spread in your home.
Do this craft with your kids; everyone can put their own touch on it! These look festive when displayed on an entryway table with faux snow, mini Christmas trees, string lights, and other small accents.
Supplies Needed
Empty toilet paper roll
Red paint
Black fine tip marker
Construction paper (red, black, and white)
How To Make It
Step 1: Paint the outside and inside of the toilet paper roll with red paint. Let it dry before going to step 2.
Step 2: Using a fine tip black marker, draw lines outside the toilet paper roll to represent bricks. Use a ruler to get straight lines.
Step 3: Now it’s time to create Santa’s legs and gift sack. Use the red paper to cut out 2 thin rectangles for the legs. Then, cut out 2 small ovals with white paper, and 2 small ovals with paper paper. Glue these to the legs to be the bottom of his pants and his shoes. Then cut out the gift sack shape with the red paper.
Step 4: Next, glue the legs inside of the toilet paper holder. They should be sticking out slightly with the feet up.
Step 5: Glue the gift sack inside the holder so it’s slightly hanging off the top. Display with other small accents!
5. DIY Recycled Bottles Christmas Accent
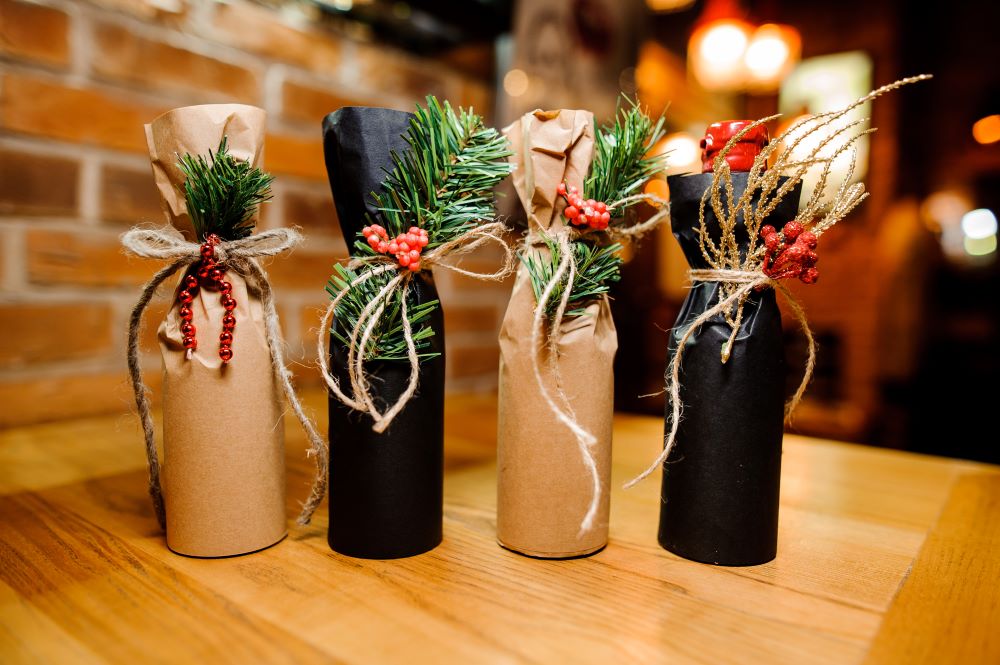
Before you throw those soda and beer bottles into the recycling bin, think about saving them! These DIY Recycled Bottles are incredibly easy to make and they result in a beautiful spread of Christmas accents that will match well with other holiday decor.
You can optionally wrap fairy lights around these bottles to add a magical element to these accents. These bottles look festive displayed on your mantel or coffee table, or they can even be used as a unique dining table centerpiece.
Supplies Needed
Empty soda or beer bottles
Brown and black Kraft paper
Decorative pine greenery and berries
Twine rope
How To Make It
Step 1: Make sure to rinse out and clean your empty bottles before starting this craft.
Step 2: Cut out pieces of Kraft paper. They should be large enough to cover the entire bottle.
Step 3: Wrap the paper around each bottle and secure it by tying the twine rope into a bow on the neck of the bottle.
Step 4: Stick the pine greenery and berries in between the twine rope to accent the bottle.
Step 5: Optionally, wrap some fairy lights around the bottle for an extra festive touch.
6. DIY Mini Pasta Christmas Trees
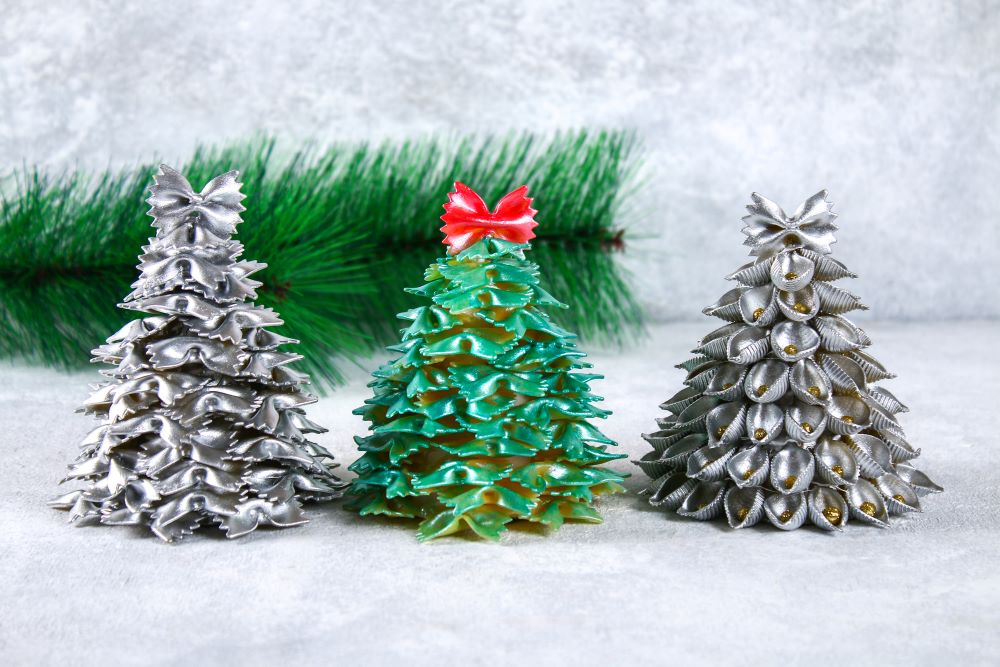
If you’re looking for fun and unique DIY Christmas decorations to make, these DIY Mini Pasta Christmas Trees will suit you well!
You can use any type of pasta you want for this craft; however bowtie pasta usually works best. Feel free to use other colors of spray paint as well if you don’t want the traditional look. Bright pastel colors will look especially interesting for a different take on this craft.
Supplies Needed
Uncooked pasta (bowtie or other pasta of your choice)
Cardboard crafting cones
Green, red, and silver spray paint
Hot glue gun
How To Make It
Step 1: Using the glue gun, glue your pasta to the cardboard cone, starting with the bottom row. Make sure to arrange them in an orderly pattern.
Step 2: Glue a single bowtie pasta at the top to represent the tree topper.
Step 3: Once the glue dries, spray paint the tree in the color of your choice.
7. DIY Cinnamon Stick Christmas Candle Holder
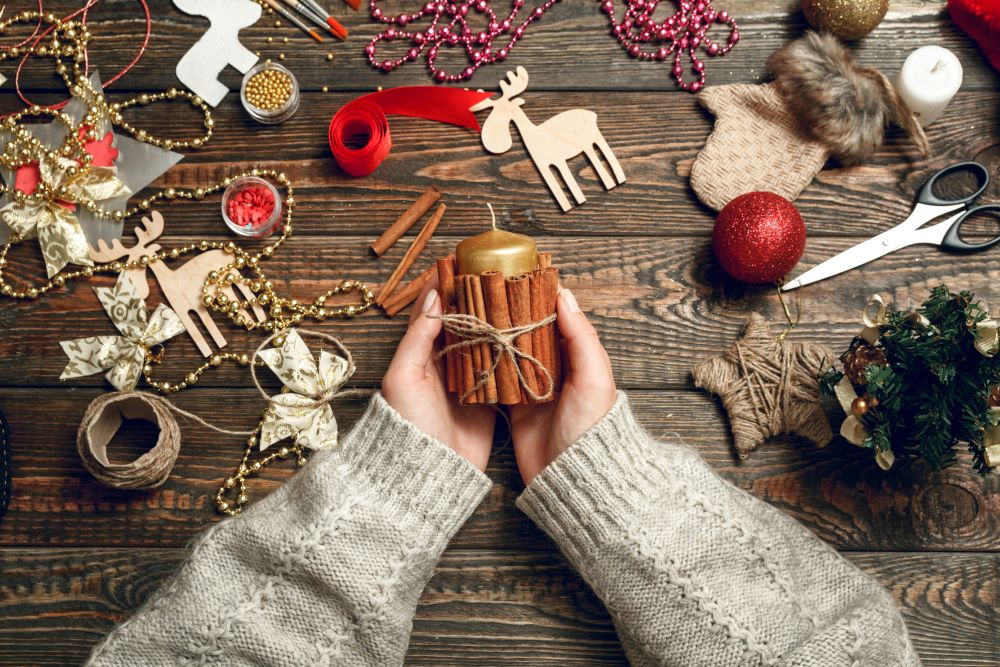
The DIY Cinnamon Stick Christmas Candle Holder is a quick and easy way to add beautiful holiday accents to any room in your home!
You can use any candles that you want for these; however, it’s best to use scented candles that work well with cinnamon. You can use scented candles such as apples, nutmeg, pine, or even more cinnamon.
Supplies Needed
Pillar candles
Cinnamon sticks
Hot glue gun
Twine rope
How To Make It
Step 1: Hot glue the cinnamon sticks together one by one by lining them up around a candle. Make sure to place them tightly against the candle so it won’t be too big.
Step 2: Let it dry.
Step 3: Finally, tie a piece of twine rope into a bow around the cinnamon sticks for a decorative touch.
Are you looking for Christmas decorations at an affordable price? Visit our Holiday Headquarters to find a selection of holiday decor including wreaths, ornaments, lighted decor, mantel accents, and much more!

Read Next: How To Decorate Your Mantel For Christmas


I love them, I love them I love them!!