
5 DIY Easter Centerpiece Ideas For Your Dining Table
If you’re looking for an affordable way to decorate your home for Easter, you can easily craft some of your own decorations! Setting up an Easter dining table during the spring season is a great way to brighten up your space with bright colors and fun Easter symbols. Make your own Easter centerpiece to establish a fresh theme in your dining room or kitchen. Here are 5 easy and simple DIY Easter centerpiece ideas for your dining table.
1. DIY Pink Easter Egg Flower Vase
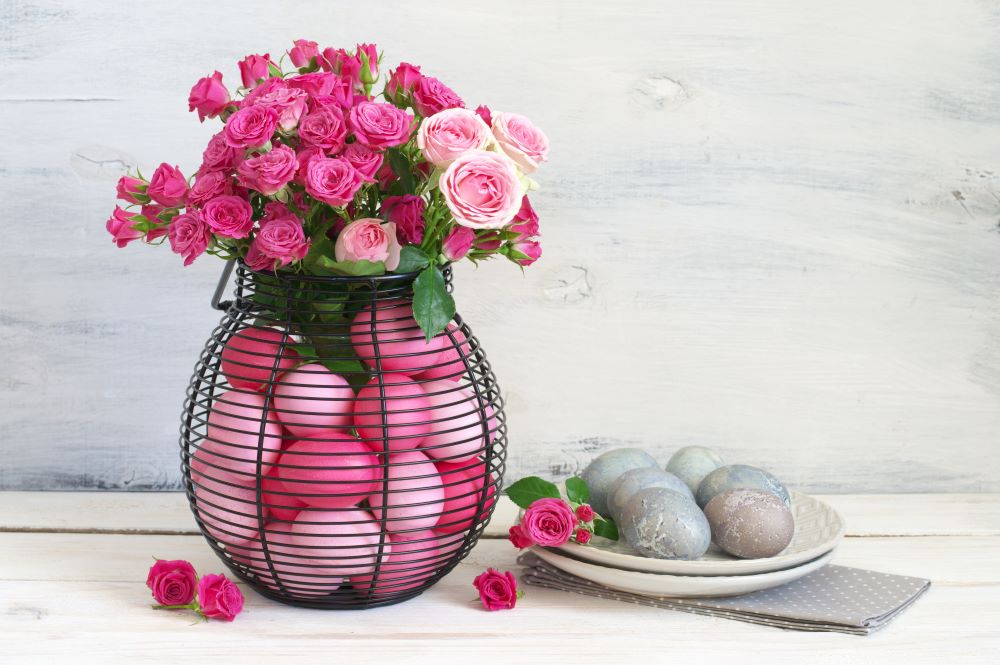
If you want a fun and feminine centerpiece that’s easy and quick to put together, this DIY pink Easter egg flower vase is the craft for you! The best part of this DIY Easter centerpiece is that it won’t take up much time or much money to create. This centerpiece will look beautiful displayed on your Easter table with other pink accents such as a pink flower tablecloth, pink cloth napkins, and cute pink bunnies. You can even combine it with some of these other DIY Easter centerpiece ideas too!
Use real or faux roses for this centerpiece. If you want it to last for a long period of time during the spring season, you might want to use the artificial flowers. However, if you’re setting up for your Easter meal, real roses will make the room smell wonderful. You can also use a different color scheme if you don’t want pink. Try for another classic spring color such as light blue, green, or yellow – or use a mix of colors for a unique and festive look.
How To Make The Craft
Supplies Needed
Metal wire vase (or clear glass vase)
Set of plastic Easter eggs (in pink and white)
Pink roses (real or faux)
Instructions
- Start by choosing a vase. A metal wire vase works especially nicely for this craft; however, you can also use a clear glass vase. Just make sure whichever vase you choose is see-through.
- Next, it’s time to add your eggs. Plastic eggs are your best option for this centerpiece. But you can also use dyed eggs if you want. To get the pink look, go for a selection of pink and white egg, or use eggs in various shades of pink.
- Finally, add your flowers – real or faux. Pink roses look beautiful displayed in your Easter egg vase, but you can also use pink tulips, pink lilies, or pink carnations.
2. DIY Easter Egg Tree Centerpiece
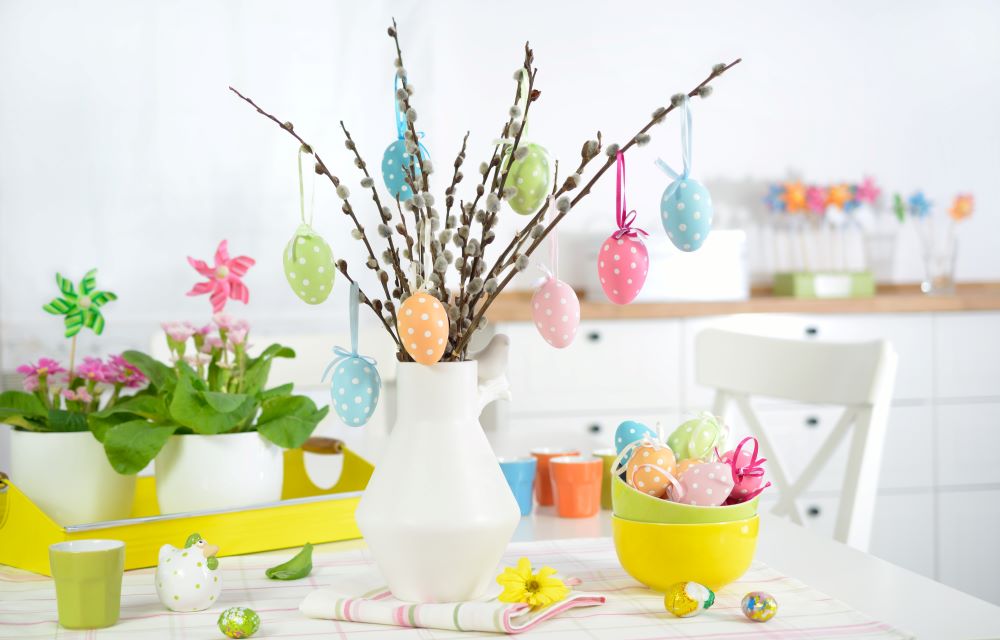
Easter egg trees are a nice way to add an eye-catching piece to the center of your dining table. It’s a fun alternative to flowers and it’s something that can be kept up during the beginning of springtime to make your home feel bright and cheerful. Luckily, it’s very simple to make your own Easter egg tree centerpiece – this is a more affordable way to get the look you want!
Much like the other DIY Easter centerpiece ideas on this list, this craft is fairly modifiable and customizable. Feel free to use any vase that you want, any type of branches, and use either plastic eggs or your own dyed eggs. The color selection is also where you can have some fun and make it match your personal style. Create a welcoming spring masterpiece for your Easter table.
How To Make The Craft
Supplies Needed
Flower vase
Artificial branches
Plastic Easter eggs or dyed eggs (in various colors)
Ribbons (in various colors)
Hot glue gun
Instructions
- First, pick your vase. Make sure to choose a vase that is narrow towards the top to allow the branches to stay in place.
- Then, add your branches. You can use almost any selection of artificial tree branches for this centerpiece. Alternatively, you can even paint the branches a pastel color for an even brighter look.
- Next, get your eggs ready. Plastic eggs will work best but you can also use dyed eggs. Cut your ribbon into small pieces, make a loop, and tie the ends into a bow. Then, hot glue the bow end to an egg. Repeat until all eggs have ribbons on them.
- Hang up all your eggs on various levels of the branches.
- Pair your tree centerpiece with an Easter themed tablecloth or table runner for a complete look.
3. DIY Flower Easter Egg Nest
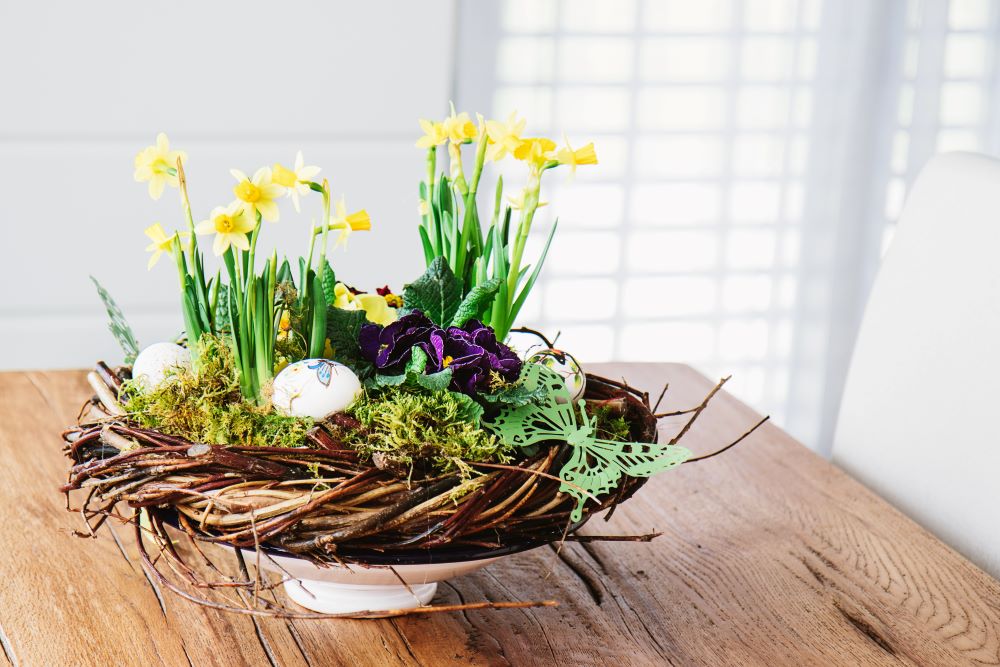
If you want a nature themed table, this DIY flower Easter egg nest will result in a unique centerpiece that fits your style perfectly! This centerpiece looks especially nice with a farmhouse style dining room or with any rustic style decorations. Place this on a distressed wood table for the ultimate coordinating look.
This craft allows you to use a variety of faux flowers of your choice – get creative with your display and mix it up with various colors. You can also use any eggs that you want. Feel free to dye your own eggs, paint patterns on them, or simply use plastic eggs. For an even more unique look, you can create several nest centerpieces of different sizes. Then, display them on different sized cake stands of varying heights to give your table an artistic look.
How To Make The Craft
Supplies Needed
Artificial bird’s nest
Craft moss
Faux daffodils and other flowers
Decorated Easter eggs (or plastic eggs)
Cake stand
Instructions
- Start by covering the inside of your bird’s nest with craft moss. Make sure you have enough to create a hearty pile.
- Next, you can add your faux flowers. Find flowers with wire ends so you can easily insert them into the nest and keep them standing. Create any assortment you want with typical spring flowers such as daffodils, tulips, and lilies.
- After you set up your flowers, add your Easter eggs. These can be eggs you decorated and dyed yourself, or you can use plastic eggs for longevity.
- Feel free to add any other accessories onto the nest, such as a decorative butterfly.
- Once your nest is complete, display it on a cake stand in the center of your table.
4. DIY Easter Eggs On A Log Centerpiece
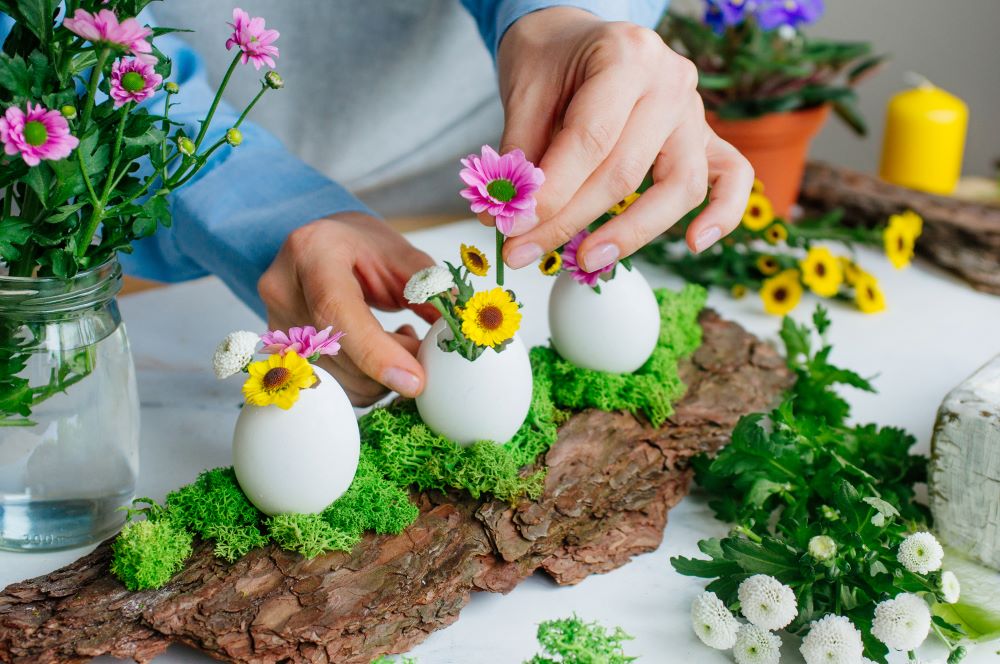
Much like the Easter egg nest craft, this DIY Easter eggs on a log centerpiece craft will also give your table a nature-filled appearance. Since this craft uses real egg shells, this is a perfect one-time use centerpiece idea for your Easter meal! However, if you want to use this for a longer period of time, you can swap it out with plastic eggs.
You can use also any types of flowers for your centerpiece. Daisies, tulips, lilies, and small roses all work well if you want the ultimate spring appearance. Play around with your flower selection to give your centerpiece a lot of bright colors and variety.
How To Make The Craft
Supplies Needed
Wooden craft log
3 eggs
Craft moss
Real or faux flowers
Knife
Hot glue gun
Instructions
- Start by arranging your craft moss on top of the wood log. Hot glue the moss on top to assure that it stays in place. Make sure you leave an empty space between the moss for all 3 of your eggs.
- Next, it’s time to prep your eggs. Carefully cut the tops off of 3 eggs and empty them out completely. Rinse them out thoroughly with water.
- Then, carefully hot glue gun each egg onto the log. Space them out evenly for a clean look.
- Finally, you can add your flowers. If you’re using faux flowers, simply trim them down to fit into the eggs. If you’re using real flowers, fill the eggs with water and cut off small stems from a flower bouquet.
- Finally, display on your table. Note: if you use real flowers, these egg vases will typically only be good for a one time use.
5. DIY Easter Bunny Mason Jar Flower Vase

Easter wouldn’t feel complete without a bunny! This DIY Easter bunny mason jar flower vase will make the cutest addition to your dining table this spring. The mason jar craft is so easy and fun, that you can even get your kids involved in the crafting process. Pair these jars with some of the other DIY Easter centerpiece ideas from this list for an even more festive table.
Make multiple mason jar vases to display on your table – set them up on cake stands of different heights to add some variety to the table. Fill the jars with real or faux flowers to add some extra color to your space. If you want to be even more crafty, you can even cut out your own flowers by using felt pieces and wire stems. Have fun and be creative to get a cheerful end result!
How To Make The Craft
Supplies Needed
Mason jar
White paint
White and pink felt
Googly eyes
Black marker
Hot glue gun
Scissors
Real or faux flowers
Instructions
- First, paint your mason jar completely white. Leave it aside to dry.
- Next, it’s time to cut out your felt pieces for the bunny.
- Ears: Cut 2 pieces of white felt into a tall bunny ear shape. Then cut 2 smaller pieces of the pink felt. Hot glue the pink onto the white to make the ears.
- Feet: Cut 2 small ovals out of the white felt. Then cut 2 smaller ovals out of the pink felt, along with 6 small circles. Glue the pink pieces to the white ones to form the bunny paws.
- Nose: Cut a small circle out of the pink felt.
- After you have your felt pieces ready, and after your paint has dried. you can start gluing the felt to the jar. Glue the ears to the back of the jar and the feet towards the bottom of the front side.
- Then, glue 2 googly eyes on the face, and glue the pink felt nose on. Draw a small mouth below the nose with a black marker.
- Finally, fill the jar with real or faux flowers to display on the table.
Now that you’re inspired by these DIY Easter egg centerpiece ideas, check out our selection of Easter Decor & More! Shop Easter decorations for the rest of your house such as bedding, bath collections, small accents, garden decor, and much more.
Read Next: 7 Easter Decorating Ideas For A Festive Home


