
7 Easy DIY Planters For Your Garden
It’s time to set up your garden for the spring and summer. Make it look even more magical and unique with the help of beautiful flower planters that you can display all season long. Crafting your own planters can add some personal style and flair to your space; create something that you’ll enjoy viewing during your outdoor relaxation in the comfort of your own yard. From upcycled materials to quick crafting hacks, here are 7 easy DIY planters for your garden to display all spring and summer long.
1. DIY Upcycled Wheelbarrow Planter
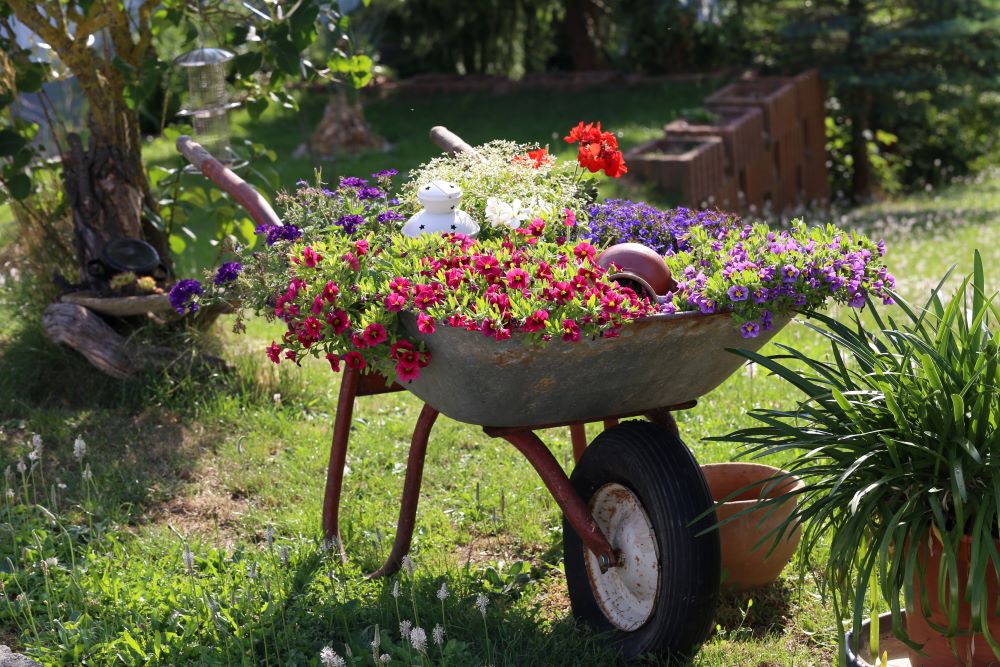
Upcycling is a great way to display unique planters in your garden without spending a fortune. This DIY upcycled wheelbarrow planter idea is so easy because it only requires a few simple steps to get a beautiful display.
You can use any old wheelbarrow made of almost any material, although keep in mind that wood is more susceptible to mold from watering your flowers. The wheelbarrow planter can hold almost any type of flower selection – just find flowers that grow nicely in containers. Set up your wheelbarrow planter in an area of your garden, or alternatively showcase it on your patio for a unique look.
Crafting Instructions
Supplies Needed
Old Wheelbarrow
Drill
Steel Garden Stake Staples
Paint (optional)
Instructions
- First you’ll need to drill some holes on the bottom of your wheelbarrow. This is highly important because your planter needs drainage holes to properly drain out the water.
- Next, decide if you want to paint your wheelbarrow. If you prefer the rustic look of a galvanized metal or distressed wood wheelbarrow, leave it alone. However, if you want a fresh look, a coat of bright paint can work wonders.
- Then you’re going to want to secure your wheelbarrow planter. Pick the spot you want to display it and secure it down with the help of steel garden stake staples. If you’re displaying it on the patio, you can skip this step.
- Once secured, you can finally add your potting soil and flowers.
2. DIY Wood Pallet Flower Pot Hanger
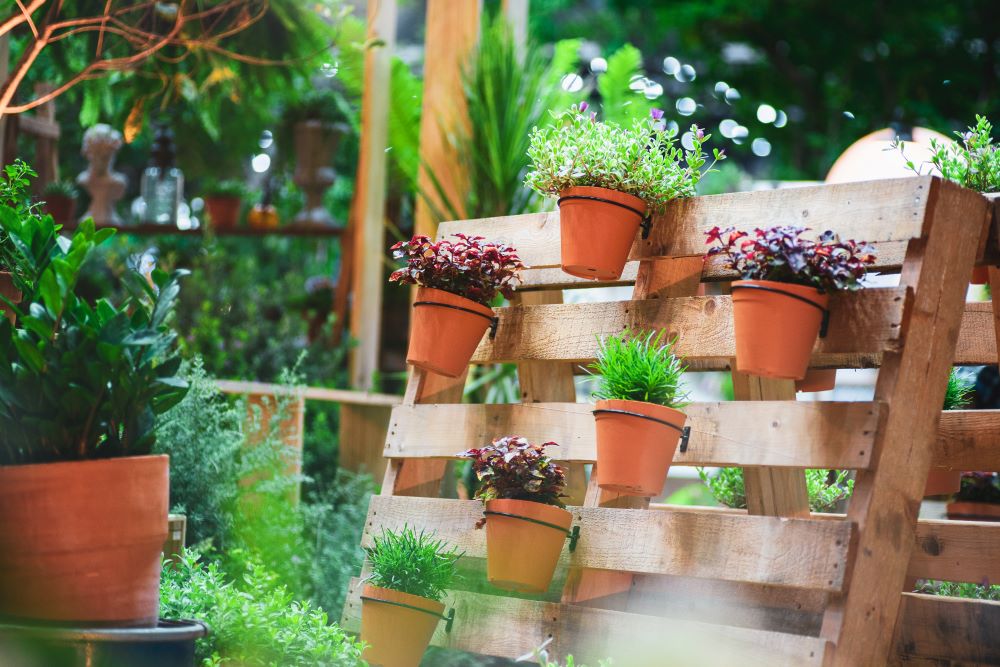
Wood pallets are so versatile and you can easily find them with a quick internet search. If you’re even just a little bit handy, you can very quickly put together a DIY wood pallet flower pot hanger! This is a wonderful idea for showing off a variety of flowers and plants in your yard in an interesting way.
If you want a bright and colorful look, you can paint the slats on the pallet in a variety of colors to match your other decorations. However, you can also go for a more natural and simple look by not painting the wood at all. You can also add color by painting the terra cotta flower pots. Make this DIY craft your own by deciding on the color and style that will best fit into your outdoor space.
Crafting Instructions
Supplies Needed
Wood Pallet (preferably heat treated)
Sand Paper
Acrylic Paint (optional)
Drill
Screw Driver
4″ Worm Clamps
1/4″-20 Zinc Machine Bolts
Wing Nuts
Small Terra Cotta Flower Pots
Instructions
- Start by sanding down your pallet to smooth out any rough edges.
- Plant your flowers into your pots and place them aside for now.
- Now it’s time to paint if you’ve decided to add color to your pallet. You can truly paint it any colors you want – use a different color for each slat or keep it all the same. Do 2 coats to make it look bright.
- Prep your worm clamps by drilling a hole into each of them. Note: the drill might flatten the clamps temporarily but they will round out again when you tighten them around your flower pots.
- Drill holes into your pallet in the places you want to hang each pot. Make sure the holes are the size of your bolts.
- Place the bolts through the worm clamps and then into the holes on the pallet. Secure the back with wing nuts.
- Now you can start placing your flower pots inside of the warm clamps. Tighten each clamp around the pot by using a screwdriver.
- Display your pallet on a slight angle to balance out the weight of the flower pots.
3. DIY Teapot Flower Planter
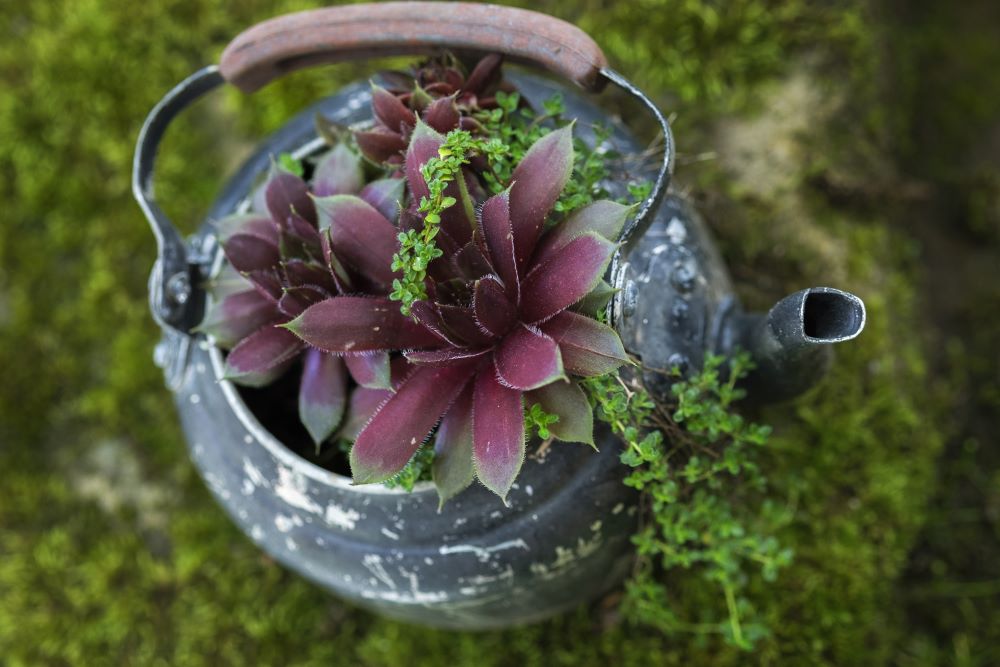
Another unique way to display your flowers is to take an object that you wouldn’t normally use as a planter and transform it. This teapot planter is an easy DIY that almost anyone can do! Simply take an old teapot and transform it in less than 10 minutes.
Create a fun spring display by creating multiple teapot planters and setting them up on the patio, porch, or on an outdoor table. The teapots can also be set up on a small table within the garden for an even more whimsical look. You can even use a teapot planter indoors on your windowsills to add some spring cheer into your home.
Crafting Instructions
Supplies Needed
Old Teapot
Drill
Paint (optional)
Instructions
- Start by drilling holes into the bottom of the teapot. Make sure they’re big enough for water to properly drain through.
- If you want to paint your teapot or spray paint it, you can do it in this step. If you’re going for a rustic look, you can use a vintage teapot without painting it.
- Plant your flowers and display the cute teapot planter on an outdoor table.
4. DIY Wood Log Succulent Planter
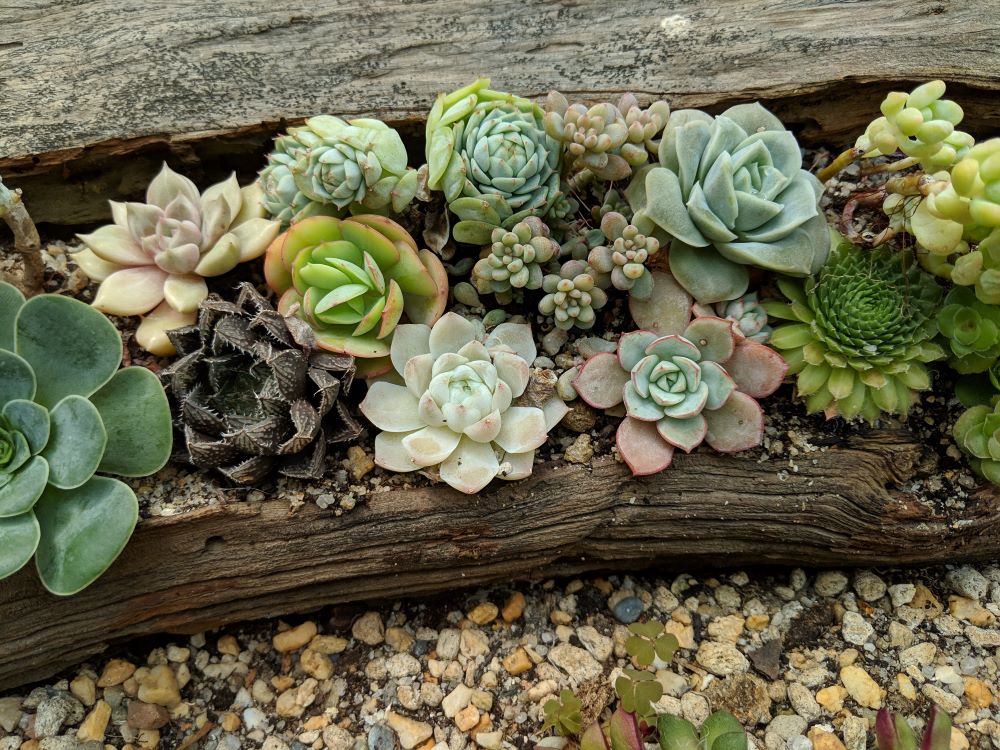
Succulents are not only easy to care for, but they can also give your garden and home a unique look with a mix of colors and variations. This DIY wood log succulent planter is an interesting way to display your succulents to give off a rustic look.
Carving out the wood log is much easier than you’d think! If you have a larger piece of wood, use a drill with hole saw attachments, and if you have a smaller piece of wood, use some simpler carving chisels. As long as you have the proper equipment, it won’t take you too long to carve out the wood log.
Crafting Instructions
Supplies Needed
Wood Log
Drill With Hole Saw Attachments
Carving Chisels
Hammer or Wooden Mallet
Sandpaper
Instructions
- First, mark the area you want to carve out on the log. The length depends on how many succulents you want to plant. You can easily mark the space with some white chalk.
- Next, you can carefully start carving out your space. You should leave about 3-4 inches of wood towards the bottom of the log and about 1-2 inches towards the edges.
- Once you carve out your log, make sure to drill some drainage holes on the bottom.
- Feel free to sand off any rough edges in your carving before planting your succulents in the log, or leave it ragged for a rustic look.
5. DIY Mosaic Flower Pot
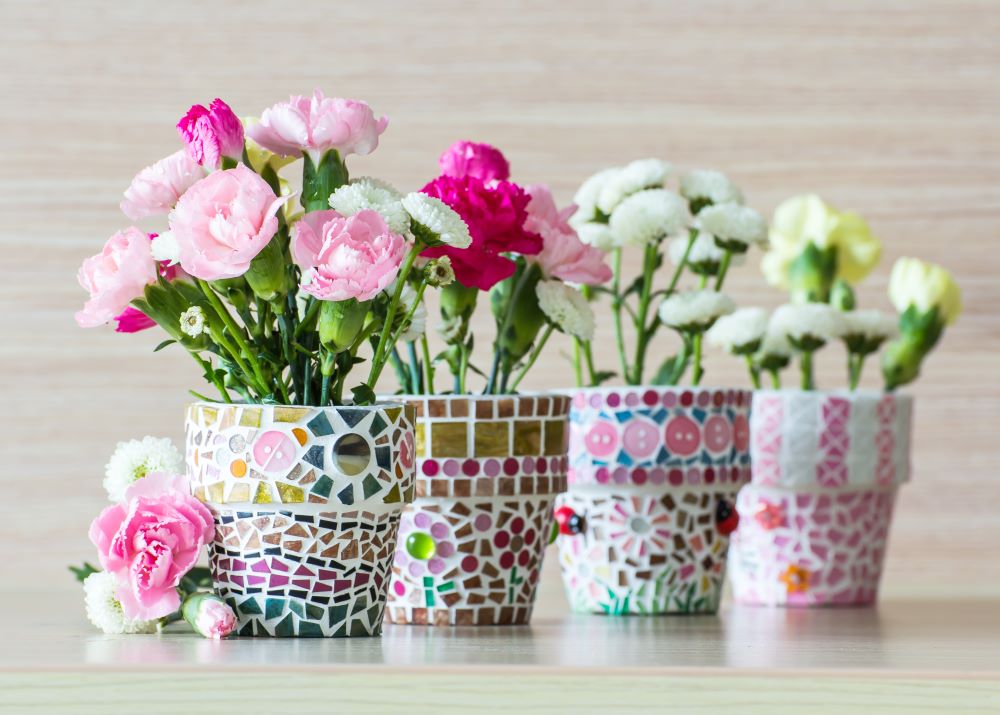
Mosaic decorations can always be a great addition to your outdoor space in the springtime. These DIY mosaic flower pots are a beautiful craft that allows you to display your flowers with style and flair. While this DIY can get a little messy, older kids can even do this project with some supervision.
For this craft, you can use mosaic tiles or you can even use broken plates for more variety. The fun thing about this project is that you can arrange your mosaic tiles in any design that you want. You can plan out your design ahead of time to make the craft easier, or you can go rogue and make your design random for a whimsical look.
Crafting Instructions
Supplies Needed
Mosaic Tiles
Terracotta Flower Pots
Tile Adhesive
White Mosaic Tile Grout
Tile Cutter
Mosaic Sealer
Instructions
- Start by cutting your tiles into pieces. Make sure the pieces are cut to the correct size – they should be able to comfortably fit onto your pots. Note: make sure to use gloves and safety goggles when cutting tiles.
- Once you have all your tile pieces cut out, you can start placing them onto your pots using the tile adhesive. Apply your tile pieces in any pattern of your choosing, whether it’s random or a unique repetition.
- Let the adhesive sit for about 5-6 hours.
- Next, you can start grouting your mosaic pot. Apply the grout to all the spaces in between your tiles. It’s ok if you get grout on top of your tiles; you’ll wipe it off in the next step.
- After 15 minutes, you can wipe away the grout from the tiles by using a damp cloth.
- Let the grout set for about 24 hours.
- Wipe the pot down with a damp cloth again to clear up any residue.
- Lastly, apply a mosaic grout sealer to finish it off.
6. DIY Concrete Flower Planter
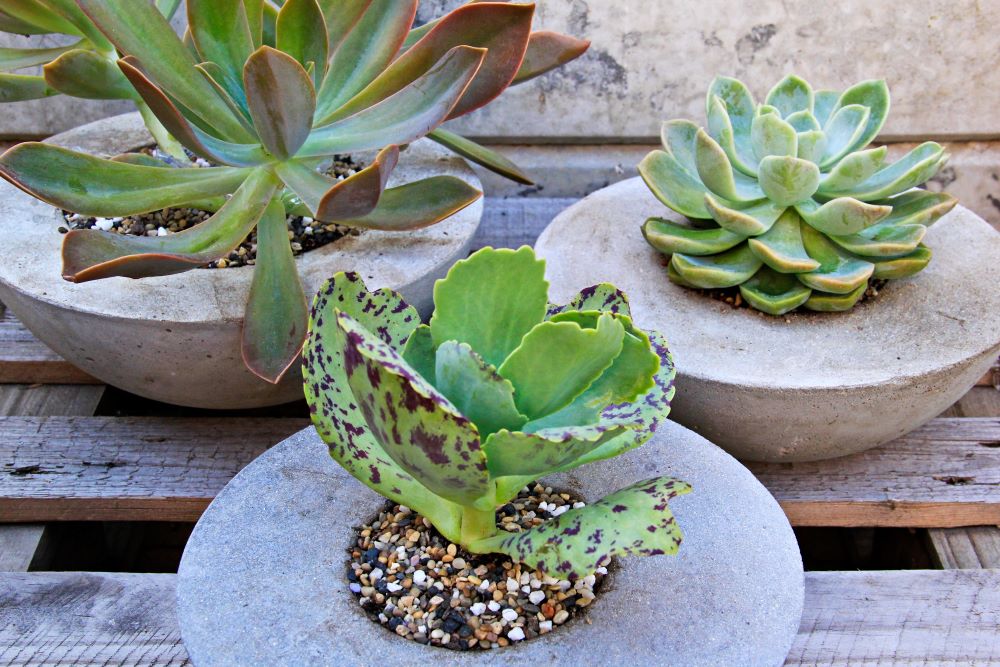
The DIY concrete flower planter is the perfect craft that anyone with any skill level can do! In addition to some of the other easy DIY planters on this list, these are nice and sturdy and are much easier to create than they appear. You can use any size containers for your molds; just make sure to use coordinating sizes to properly make this craft.
Feel free to use real or faux flowers in these planters. If you want to use faux ones, you don’t need to drill holes in the bottom. Depending on the size of the planter you make, almost any flowers and plants will look nice planted inside. However, these work especially well with most types of succulents. Display them outdoors or indoors for a bold look.
Crafting Instructions
Supplies Needed
Concrete Mix
Bucket
Water
Shovel/Trowel
Molds – 1 Small & 1 Large Plastic Food Storage Containers
Cooking Oil
Paint Brush
Sandpaper
Drill
Instructions
- Start by mixing the concrete with water into a bucket. Use a shovel to mix together thoroughly. Follow direction on the concrete for measurements.
- Paint cooking oil around the outside of your small plastic container. Set aside for now.
- Fill your larger plastic container with the concrete mix. Use your shovel to carefully empty the concrete into the container.
- Then, push the smaller container into the center of the large container. Weigh the small container down with a large rock so it’ll stay put. Let the concrete dry overnight.
- Once the concrete is fully dry, carefully remove the molds. Do this by turning it upside down and gently tapping the bottom.
- Rub down the planter with sandpaper to get a smooth look.
- Carefully drill some drainage holes in the bottom before filling the planter.
7. DIY Antique Chair Flower Planter
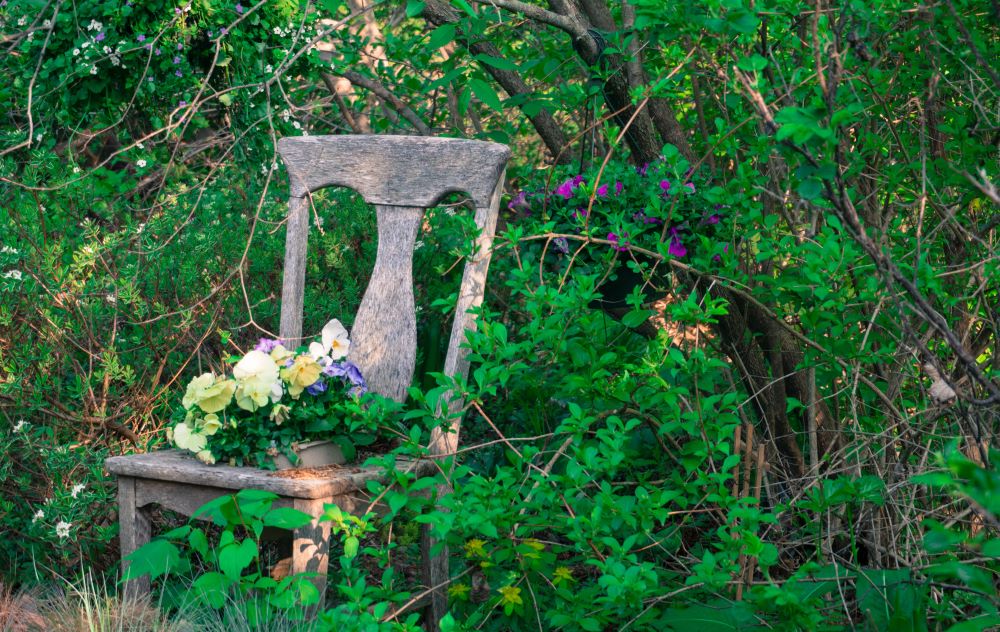
Lastly, this antique chair flower planter is another fun and easy DIY planter that will probably take you under and hour to put together! If you like the rustic country look or are just a fan of the antique style, this chair planter will fit into your space nicely.
Use any old chair you have sitting in storage, or find a unique one at a thrift shop. If you prefer a more fresh look, you can easily paint the chair any color that you want – opt for bright colors to get that springtime look. Make sure to measure your chair seat opening to determine the size of the liner that you need. Planning this out ahead of time will save you any frustration later on.
Crafting Instructions
Supplies Needed
Antique Chair
Burlap Plant Liner (fit the size of your chair seat)
Coco Fiber Planter Liner (fit the size of your chair seat)
Staple Gun
Instructions
- Prep your chair by removing the seat. You can sand down and paint the chair for a fresher look; however, if you want it to look rustic, you should keep it in its original form.
- Once your chair is prepped, place the burlap liner into the chair seat hole and staple it to the edges of the chair.
- Then, staple the coco fiber liner on top of the burlap.
- You can then place potting soil and flowers directly into the liner, or you can opt to keep the flowers inside a plastic container.
Now that you’ve learned how to make these easy DIY planters for your garden, visit our Garden Center for even more springtime inspiration! Find outdoor decorations, live plants, solar lighting, gardening solutions, and much more.

Read Next: How To Plant A Garden On A Budget


